Snickerdoodle up and running
Description
First, I’m not an expert, I learned a lot by reading and hacking on this so there may be misunderstanding on my part and if you find something that I did wrong please let me know.
These are instructions on how to get custom hardware working with snickerdoodle. I’ll be using Snickerdoodle black but these instructions should work with any board.
Intro
My wife bought me a Nintendo switch. I liked the form factor and it got me thinking about FPGA development boards. The one things I didn’t like about them is that FPGA devboard are for lab benches. I wanted to make a devboard that I could use in experiments.
To make a long story short I found Snickerdoodle from Krtcl and I thought it would be a great fit for my project. I didn’t think it would be that hard to adapt snickerdoodle to my board. This was not the case. This post is the sanatized version of my build.
The Snickerdoodle book was the main resource I used to build the kernel but I also relied heavily on the forums at both Krtcl and Xilinx.
I did all of my work on an Ubuntu box so I won’t describe how to do anything on a Windows box. I also built this for Vivado 2017.4 so if some commands don’t work with your system you might need to change the commands to match up with your installation.
I created a directory where i could work on everything related to this projects. You will see a lot of the information referenced to this directory
mkdir -p ~/Projects/snickerdoodleI broke this down into steps
Steps
- Download and install the necessary files.
- Build an FPGA Image.
- Generate the First Stage Boot Loader.
- Download and setup kernel scripts.
- Download and setup u-boot scrips.
- Build u-boot.
- Setup the rootfs.
- Build the kernel.
- Configure an SD Card.
- Create a boot image.
- Copy Files to the SD Card
Download and Install the Necessary Files
Krtcl offers Xilinx Board files that are read by Vivado. This simplifies the build process. When starting a project, the user simply selects the board file instead of identifying the correct FPGA and writing up a custom constraint file.
To do this download the vivado files Vivado Board Files
cd ~/Downloads/
wget https://github.com/krtkl/snickerdoodle-board-files/archive/master.zip
unzip master.zip
cd snickerdoodle-board-files-master
sudo cp -a snickerdoodle /opt/Xilinx/Vivado/2017.4/data/boards/board_files/
sudo cp -a snickerdoodle_black /opt/Xilinx/Vivado/2017.4/data/boards/board_files/
Build an FPGA image
Build an FPGA image. These are the same instructions that can be found in the snickerdoodle book.
I started out with the example designs.
echo "Change to snickerdoodle directory"
cd ~/Projects/snickerdoodle
echo "Get the example projects from Krtcl's Github page"
git clone https://github.com/krtkl/snickerdoodle-examples.git
cd snickerdoodle-examples/snickerdoodle_black_GPIO
echo "Source the Xilinx Settin"
source /opt/Xilinx/Vivado/2017.4/settings64.sh
vivado -mode gui -project snickerdoodle_black_GPIO.xpr &
This will ask if you want to “Automatically update to the current version”, say “Okay”
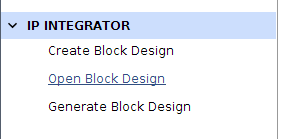
After it has finished converting the project open up the block diagram.
This will load the block diagram but it will probably throw up this dialog box:
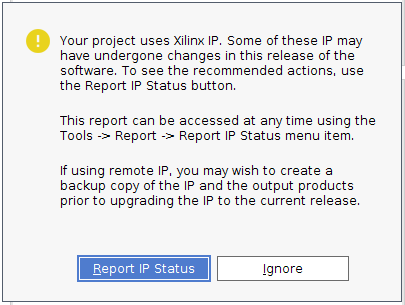
press ‘Report IP Status’ and scroll down to the bottom and select ‘Upgrade Selected’

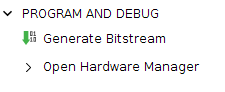
Build the project by pressing ‘Generate Bitstream’
After the bitstream is generated you will see this screen:
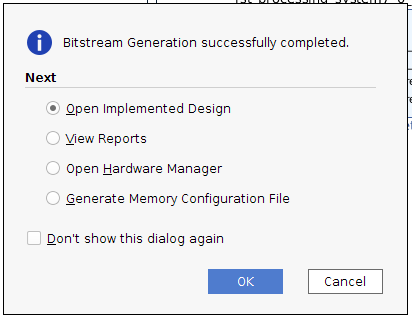
Press ‘Cancel’
Generate the First Stage Boot Loader.
The output of this step is the first stage bootloader (FSBL). This is the first thing the Zynq processor sees when it turns on. The job of the FSBL is to initialize the processor and then load u-boot (the second stage boot loader). the job of the second-stage bootloader is to load the Linux Kernel.
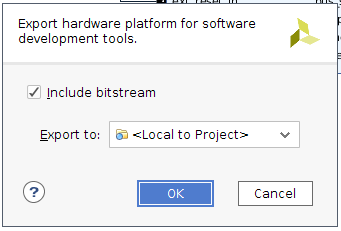
Within the Vivado project that you used to build a bitstream go back to the block diagram view. Under the ‘File’ Menu select: ‘File’ -> ‘Export’ -> ‘Export Hardware’ and when the dialog box comes up select ‘Include Bitstream’ and press ‘Okay’.
Start the SDK by going to the ‘File’ menu and select ‘File’ -> ‘Launch SDK’
SDK
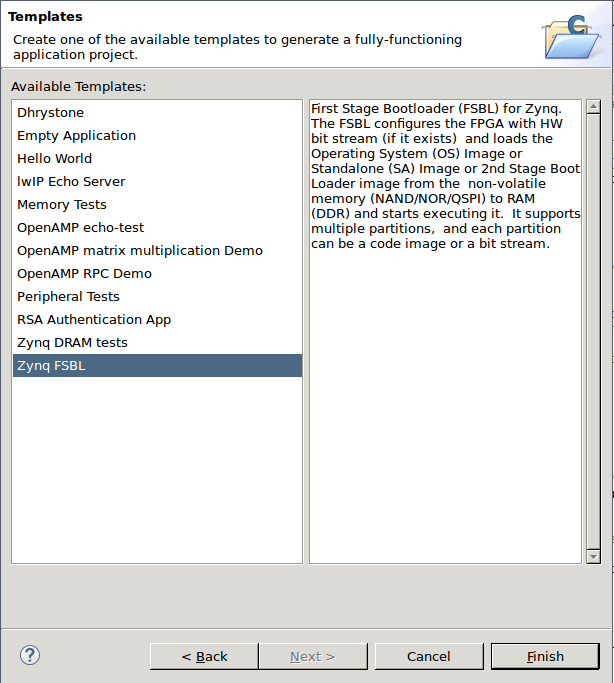
Within the SDK under the ‘File’ menu and select ‘File’ -> ‘New’ -> ‘Application Project’
Name the project ‘fsbl’

press the ‘Next’ button at the bottom and select ‘FSBL’ project at the bottom
The project should automatically build. The generated FSBL is located:
<your project>/<your project>.sdk/fsbl/debug/fsbl.elf
We will be using this later when we create the Boot Image.
Download and Setup Kernel Scripts
This step downloads the kernel source code from snickerdoodle’s github page as well as some scripts I wrote to help simplify building the kernel.
First navigate to the snickerdoodle directory
cd ~/Projects/snickerdoodle
echo "Clone Snickerdoodle's branch of the Linux kernel build"
git clone https://github.com/krtkl/snickerdoodle-linux.git
Download the build script
move it to your snickerdoodle base directory and modify it to be an executable
cd ~/Projects/snickerdoodle
echo "Move the file from the download directory to here"
cp ~/Download/build-kernel.sh .
echo "Change the build script into an executable"
chmod +x build-kernel.sh
We will eventually be building the kernel but we need to leave this for right now because we must build u-boot first.
Download and Setup U-Boot Scrips
Similar to the steps above we need to get both the u-boot source as well as the u-boot build script.
cd ~/Projects/snickerdoodle
echo "Clone Snickerdoodle's branch of u-boot"
git clone https://github.com/krtkl/snickerdoodle-u-boot.git
Download the build script
move it to your snickerdoodle base directory and modify it to be an executable
cd ~/Projects/snickerdoodle
echo "Move the file from the download directory to here"
cp ~/Download/build-uboot.sh .
echo "Change the build script into an executable"
chmod +x build-uboot.sh
As noted in the snickerdoodle book there is a strange ‘chicken and the egg’ problem. In order to build uboot you need a tool in the kernel to be built (dtc) while in oder to build the kernel for uboot you need a tool found in u-boot (mkimage).
One of the functions of the ‘build-kernel.sh’ script is to build the scripts that are found within the kernel. To do this execute the following:
./build-kernel.sh -sBuild U-Boot
Now you can build uboot by the following command:
echo "Rebuild uboot, this will configure uboot to use the correct 'defconfig' file and then build uboot"
./build-uboot.sh -r
The end of the build will look something like this:
	...
  LD      spl/drivers/spi/built-in.o
  LD      spl/drivers/built-in.o
  LD      spl/fs/fat/built-in.o
  OBJCOPY u-boot.srec
  LD      spl/fs/built-in.o
  OBJCOPY u-boot-nodtb.bin
  CC      spl/drivers/fpga/xilinx.o
  SYM     u-boot.sym
  LDS     spl/u-boot-spl.lds
  COPY    u-boot.bin
  MKIMAGE u-boot.img
  LD      spl/drivers/fpga/built-in.o
  LD      spl/u-boot-spl
  OBJCOPY spl/u-boot-spl-nodtb.bin
  COPY    spl/u-boot-spl.bin
  MKIMAGE spl/boot.bin
/home/cospan/Projects/snickerdoodle/snickerdoodle-u-boot/scripts/check-config.sh u-boot.cfg \

	/home/cospan/Projects/snickerdoodle/snickerdoodle-u-boot/scripts/config_whitelist.txt /home/cospan/Projects/snickerdoodle/snickerdoodle-u-boot 1>&2
make[1]: Leaving directory '/home/cospan/Projects/snickerdoodle/build/uboot'
and will be found here: ~/Projects/snickerdoodle/build/uboot/
Specifically u-boot is found at ~/Projects/snickerdoodle/build/uboot/u-boot
This is the arm ‘elf’ file that will be used when generating the initial boot partition of the SD Card.
Note:
If you wish to build uboot again do not use the ‘-r’ flag as this will erase all the build files, just use the following:
./build-uboot.shThis saves a lot of time.
Setup the Rootfs
This is pretty simple. Download the rootfs from the Krtcl Website:
cd ~/Projects/snickerdoodle
mkdir -p build/rootfs/
cd build
mv ~/Download/snickerdoodle-ubuntu-14.04-20160902.tar.gz rootfs.tar.gz
sudo tar xvfp rootfs.tar.gzNOTE: We need to use sudo permission because we use the ‘-p’ flag from ‘tar’ this presserves the permissions of the file system. So any file that needs to be owned by root will keep that permission level.
Now the rootfs is setup for us to edit. We will be modifying it when we build the kernel next.
Build the Kernel
Now that u-boot is build we almost have everything we need to build the kernel. There is only one thing missing. The firmware for the WIFI. The WIFI chip is developed by TI and requires the kernel to downlaod an image into it. This can be built from scratch but it is not required to build from scratch. We are going to drop in a previously build binary image for the WIFI driver and the kernel will assume it doesn’t need to build it from scratch.
Get the binary firmware for the kernel found here:
WIFI Config Binary WIFI Firmware
Download the two files and execute the following:
cd ~/Projects/snickerdoodle
mkdir -p snickerdoodle-linux/firmware/ti-connectivity
cp ~/Download/wl18\*.bin  snickerdoodle-linux/firmware/ti-connectivity/
Next we build the kernel. Similar to u-boot the first time we build the kernel it will take a while because we need to start from scratch. After we build the kernel the first time the build will be much faster.
For the first time you build the kernel use the following command:
NOTE: This script does require root privledges because it will create the kernel modules and copy them into a rootfs. It seems strange that we would need rootfs to copy into this local directory but because we copy all files with permission to the snickerdoodle board these modules must have root permission before they are copied.
./build-kernel.sh -rThe end of this script run should look like this:
  INSTALL lib/mpi/mpi.ko
  INSTALL lib/raid6/raid6_pq.ko
  INSTALL net/8021q/8021q.ko
  INSTALL net/bridge/br_netfilter.ko
  INSTALL net/ipv4/ipip.ko
  INSTALL sound/core/snd-pcm-dmaengine.ko
  INSTALL sound/core/snd-pcm.ko
  INSTALL sound/core/snd-timer.ko
  INSTALL sound/core/snd.ko
  INSTALL sound/drivers/xylon/snd-xyloni2s.ko
  INSTALL sound/soc/adi/snd-soc-adi-axi-i2s.ko
  INSTALL sound/soc/adi/snd-soc-adi-axi-spdif.ko
  INSTALL sound/soc/codecs/snd-soc-hdmi-codec.ko
  INSTALL sound/soc/codecs/snd-soc-tlv320aic3x.ko
  INSTALL sound/soc/generic/snd-soc-simple-card-utils.ko
  INSTALL sound/soc/generic/snd-soc-simple-card.ko
  INSTALL sound/soc/snd-soc-core.ko
  INSTALL sound/soundcore.ko
  DEPMOD  4.9.0-snickerdoodle-68561-gbe1c511-dirty
make[1]: Leaving directory '/home/cospan/Projects/snickerdoodle/build/kernel'
Change the owner of the modules to root
Copy the modules into the rootfs
Done
After this you can use the following command to build the kernel much faster
./build-kernel.shThis does more than just build the kernel. It does the following:
- Builds ‘uImage’ and gives it an address of 0x8000.
- Generates all the external kernel modules that can be loaded into the kernel while the kernel is running.
- Copys the generated modules into the ‘rootfs’ directory where the user’s filesystem should be loaded.
Configure an SD Card
This is taken directly from the krtcl snickerdoodle book. Using the fdisk tool we can create the correct partitions for an SD Card.
The best way to identify what is the SD Card on your Linux Box is to type the command
dmesg --followThen insert your SD Card. When I inserted my SD Card I got the following:
[136240.117442] sd 3:0:0:1: [sdc] 15523840 512-byte logical blocks: (7.95 GB/7.40 GiB)
[136240.135009]  sdc: sdc1 sdc2
The SD card we will modify is ‘sdc’ WARNING: THIS MAY BE DIFFERENT ON YOUR MACHINE!! If you perform these functions on your hard drive you will format your hard disk!!
sudo fdisk /dev/sdcWithi the fdisk here’s how I modified my SD Card when I started fdisk
Welcome to fdisk (util-linux 2.27.1).
Changes will remain in memory only, until you decide to write them.
Be careful before using the write command.


Command (m for help): p
Disk /dev/sdc: 7.4 GiB, 7948206080 bytes, 15523840 sectors
Units: sectors of 1 * 512 = 512 bytes
Sector size (logical/physical): 512 bytes / 512 bytes
I/O size (minimum/optimal): 512 bytes / 512 bytes
Disklabel type: dos
Disk identifier: 0x7edbeaaf

Device     Boot  Start      End  Sectors  Size Id Type
/dev/sdc1         2048   264192   262145  128M  c W95 FAT32 (LBA)
/dev/sdc2       266240 15523839 15257600  7.3G 83 Linux

Command (m for help): d
Partition number (1,2, default 2):

Partition 2 has been deleted.

Command (m for help): d
Selected partition 1
Partition 1 has been deleted.

Command (m for help): n
Partition type
   p   primary (0 primary, 0 extended, 4 free)
   e   extended (container for logical partitions)
Select (default p): p
Partition number (1-4, default 1): 1
First sector (2048-15523839, default 2048):
Last sector, +sectors or +size{K,M,G,T,P} (2048-15523839, default 15523839): +262144

Created a new partition 1 of type 'Linux' and of size 128 MiB.

Command (m for help): t
Selected partition 1
Partition type (type L to list all types): c
Changed type of partition 'Linux' to 'W95 FAT32 (LBA)'.

Command (m for help): n
Partition type
   p   primary (1 primary, 0 extended, 3 free)
   e   extended (container for logical partitions)
Select (default p): p
Partition number (2-4, default 2):
First sector (264193-15523839, default 266240):
Last sector, +sectors or +size{K,M,G,T,P} (266240-15523839, default 15523839):

Created a new partition 2 of type 'Linux' and of size 7.3 GiB.

ommand (m for help): w
The partition table has been altered!
Calling ioctl() to re-read partition table.
Syncing disks.
Now that the disk is formatted we need to configure the partition with the correct filesystem.
FAT32 on the first boot partition and EXT4 on the second partition.
Configure the first partition to be FAT32
sudo mkfs.vfat -n BOOT /dev/sdc1Configure the second partition to be EXT4
sudo mke2fs -b 1024 -t ext4 -L ROOTFS /dev/sdc2It’s a good idea to eject the SD Card and re-insert it.
eject /dev/sdcNow when you reinsert it you will have an SD Card with two partitions
Create a Boot Image
There are a lot of ways to boot the kernel. One way I perfer is to use ‘sysboot’ within uboot. This method loads the kernel from the ext4 file system in the rootfs parition along with the device tree binary (dtb) file into the memory and then boots the kernel from there. This method is nice because when the user wants to update the kernel all that is required is to copy the new kernel to /boot/image and the dtb to /boot/devicetree.dtb
the Sysboot will do all the rest of the work.
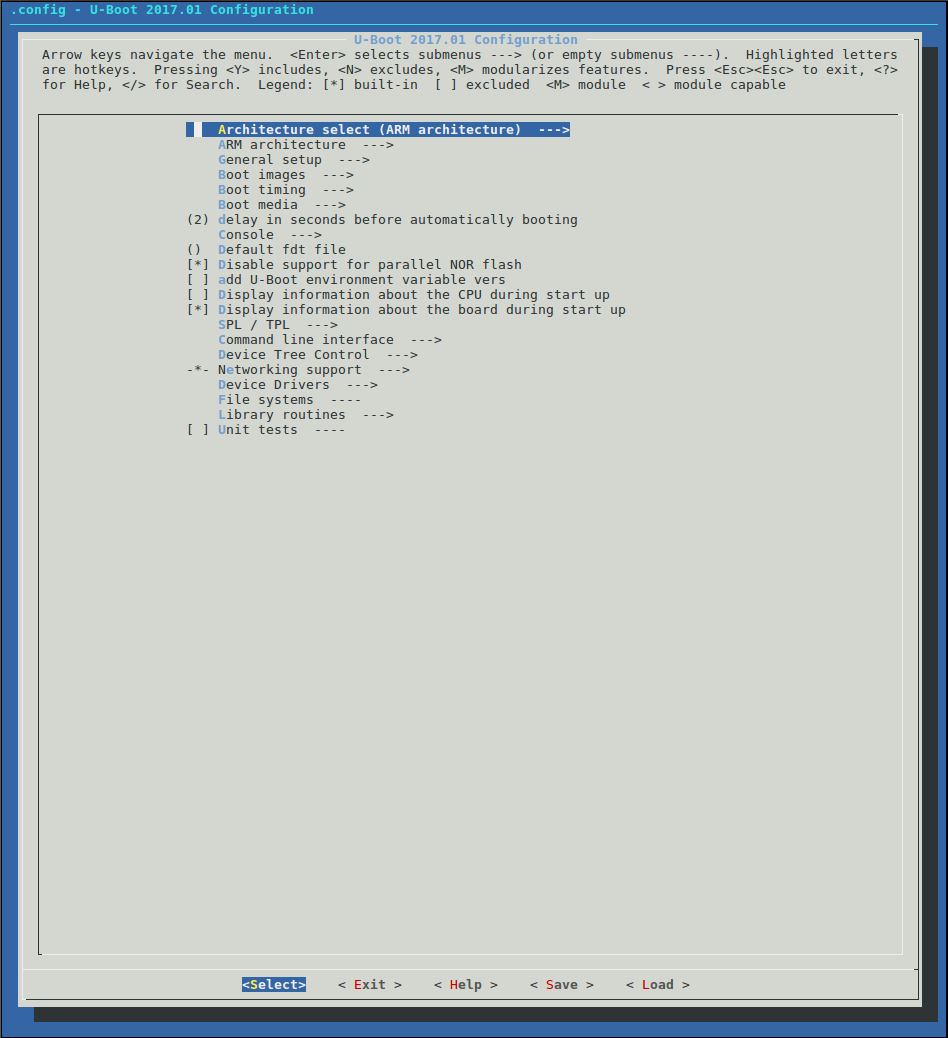
To accomplish this we will need to rebuild uboot with the ‘DISTRO_DEFAULTS’ option enabled. To do this build uboot with the ‘-m’ option which will start the ‘menu’ configuration tool.
cd ~/Projects/snickerdoodle
./build-uboot.sh -m
You will see this screen
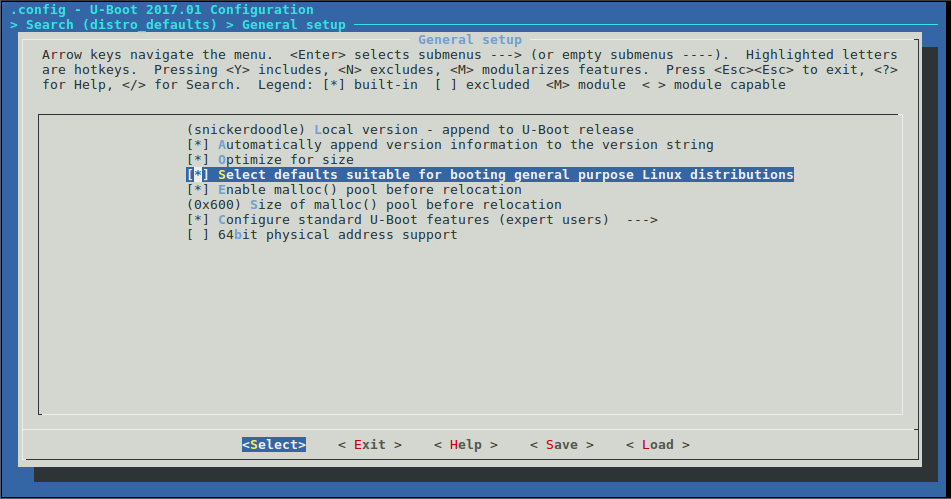
Type the following
/disto_defaultsYou will see a search result with one output. Press ‘1’ and then space to enable ‘distro_defaults’
Your screen should look like this
Press the right arrow button to get over ‘Exit’ and keep selecting ‘Exit’ until it asks you to save the configuration file. Say ‘Yes’
Before we build uboot we need to adjust the internal build environment within uboot. In it’s current state sysboot is not called when uboot first starts up. We can do this one of two ways. We can write a script and use the ‘mkimage’ tool so that the script is loaded into uboot or we can modify the default uboot environment by modify the file:
~/Projects/snickerdoodle/snickerdoodle-uboot/include/configs/zynq_snickerdoodle_black.hYou can copy and paste the ‘zynq_snickerdoodle_black.h’ file I have written to that location
Download this and copy to the correct location
cd ~/Projects/snickerdoodle
cp ~/Download/zynq_snickerdoodle_black.h snickerdoodle-uboot/include/configs/zynq_snickerdoodle_black.h
Now build uboot
./build-uboot.shCreating the BOOT.bin file
To generate the BOOT.bin we will need to get the FSBL, uboot output, device tree blob and the kernel.
To simplify things for me I created a new folder called ‘boot_builder’ from the base snickerdoodle directory.
cd ~/Projects/snickerdoodle
mkdir boot_builder
cd boot_builder
We can copy all of the generated output files into this directory, specifically we will copy the following (Note the input and output names may be different)
- fsbl.efl -> boot_builder/fsbl.elf
-
/ .runs/impl\_1/ .bit -> boot\_builder/bitstream.bit - build/uboot/u-boot boot_builder/u-boot.elf
- build/uboot/dts/dt.dtb boot_builder/devicetree.dtb
Now that we have all the files we can create our ‘BOOT.bif’ file:
cd ~/Projects/snickerdoodle
mkdir boot_builder
touch BOOT.bif
Open up the file with a text editor and enter the following text:
image : {
[bootloader]fsbl.elf
bitstream.bit
u-boot.elf
}
Now run the following command to generate the BOOT.bin file
source /opt/Xilinx/Vivado/2017.4/settings64.sh
bootgen -image BOOT.bif -o i BOOT.bin
Copy Files to The SD Card
Copy the boot.bin file to the SD Card by inserting the SD Card and running the following commands:
cd ~/Projects/snickerdoodle
mkdir boot
sudo mount /dev/sdc1 boot
sudo cp boot_builder/BOOT.bin boot/
sync
sudo umount /dev/sdc1
rmdir boot
Copy the rootfile system onto the SD Card Parition 2
cd ~/Projects/snickerdoodle
mkdir rootfs
sudo mount /dev/sdc2 rootfs
sudo cp -a build/rootfs/* rootfs/
sync
sudo umount /dev/sdc2
rmdir rootfs